Roofing Insurance Claims A Step by Step Guide
Navigate the roofing insurance claims process with this step-by-step guide, from damage assessment to payout.
Navigate the roofing insurance claims process with this step-by-step guide, from damage assessment to payout. Dealing with roof damage can be a real headache, and the thought of filing an insurance claim often adds another layer of stress. But don't sweat it! This comprehensive guide is designed to walk you through every single step of the roofing insurance claims process, making it as smooth and straightforward as possible. We'll cover everything from initial damage assessment to finally getting that payout, ensuring you're well-equipped to handle whatever comes your way.
Roofing Insurance Claims A Step by Step Guide
Let's face it, nobody wants to deal with a damaged roof. Whether it's a fierce storm, a fallen tree, or just good old wear and tear, roof damage can be a major disruption to your home life. And then comes the daunting task of dealing with insurance. It can feel like navigating a maze, full of jargon and endless paperwork. But what if I told you it doesn't have to be that way? This guide is your personal roadmap to understanding and successfully managing your roofing insurance claim. We're going to break down each stage, offer practical advice, and even give you some insider tips to make sure you get the coverage you deserve. So, take a deep breath, grab a cup of coffee, and let's get started on making this process as painless as possible.
Understanding Your Homeowners Insurance Policy for Roof Damage
Before you even think about calling your insurance company, it's crucial to understand what your homeowners insurance policy actually covers. Not all policies are created equal, and knowing the specifics can save you a lot of grief down the line. Most standard homeowners insurance policies (HO-3) typically cover roof damage caused by sudden and accidental events, such as fire, wind, hail, falling objects (like trees), and vandalism. However, there are often exclusions. For instance, damage due to neglect, poor maintenance, or wear and tear is usually not covered. Flood damage and earthquake damage are also typically excluded and require separate policies. It's also important to look at your deductible – this is the amount you'll have to pay out of pocket before your insurance kicks in. Some policies might have a separate, higher deductible for wind and hail damage, especially in certain regions. Pay close attention to whether your policy offers Actual Cash Value (ACV) or Replacement Cost Value (RCV) coverage. ACV policies will pay you the depreciated value of your roof, meaning they'll factor in its age and condition. RCV policies, on the other hand, will pay for the cost of a new roof, minus your deductible, without factoring in depreciation. RCV is almost always the better option if you can get it. Take the time to read through your policy documents, or better yet, call your insurance agent and ask them to explain your specific roof coverage in detail. Understanding these nuances upfront will empower you throughout the claims process.
Step 1 Immediate Actions After Discovering Roof Damage
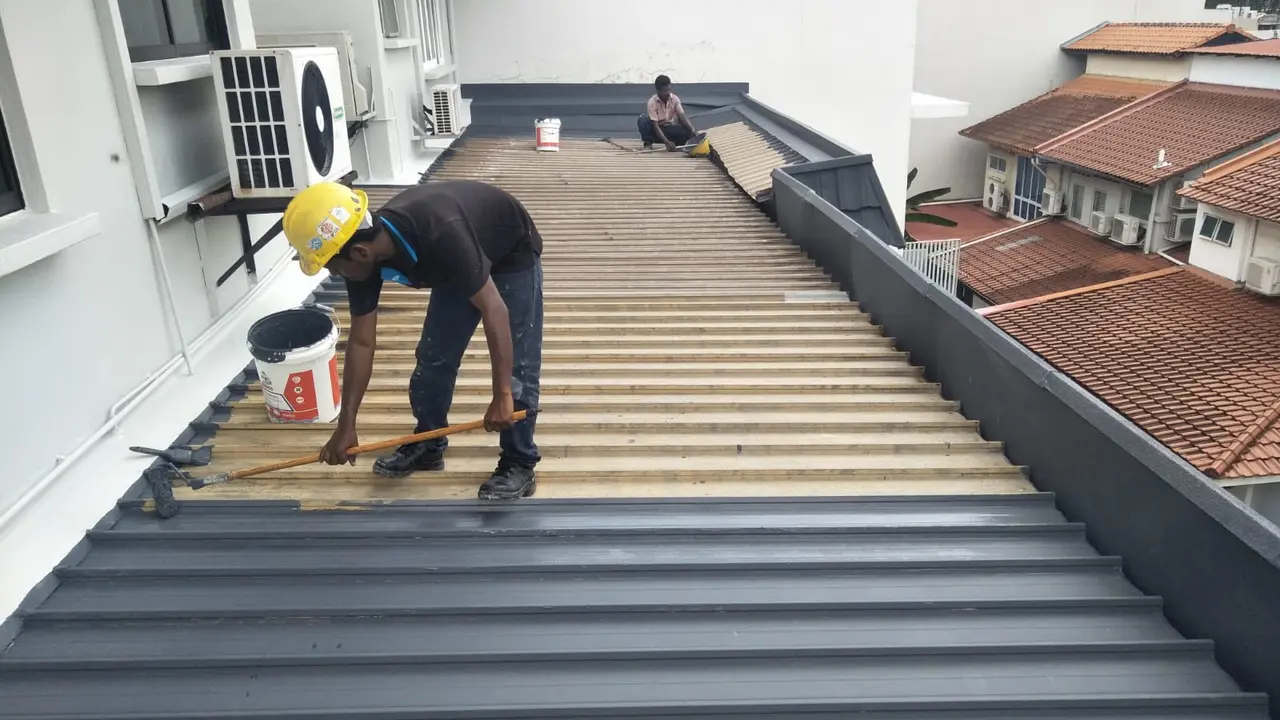
Finding damage to your roof can be alarming, but taking the right immediate steps can prevent further issues and strengthen your insurance claim. Safety first! If there's any risk of injury, stay clear of the damaged area. If you suspect structural damage or gas leaks, evacuate your home and call emergency services. Once it's safe, your priority is to prevent further damage. This might involve placing tarps over exposed areas to prevent water intrusion. You can often find emergency tarping services from local roofing contractors. Document everything! Take clear, well-lit photos and videos of all the damage from multiple angles. Include close-ups of specific issues like missing shingles, punctures, or water stains inside your home. Date and time-stamp these photos if possible. This visual evidence is invaluable for your claim. Make a detailed list of all damaged items, both on the roof and inside your home. Keep any receipts for emergency repairs you make, such as tarping costs. Do not make extensive permanent repairs before your insurance adjuster has had a chance to inspect the damage, as this could jeopardize your claim. However, temporary repairs to mitigate further damage are usually encouraged and often reimbursable. Finally, contact a reputable local roofing contractor for an initial assessment. Many contractors offer free inspections and can provide a professional opinion on the extent of the damage and whether it warrants an insurance claim. Their assessment can be a valuable tool when you speak with your insurance company.
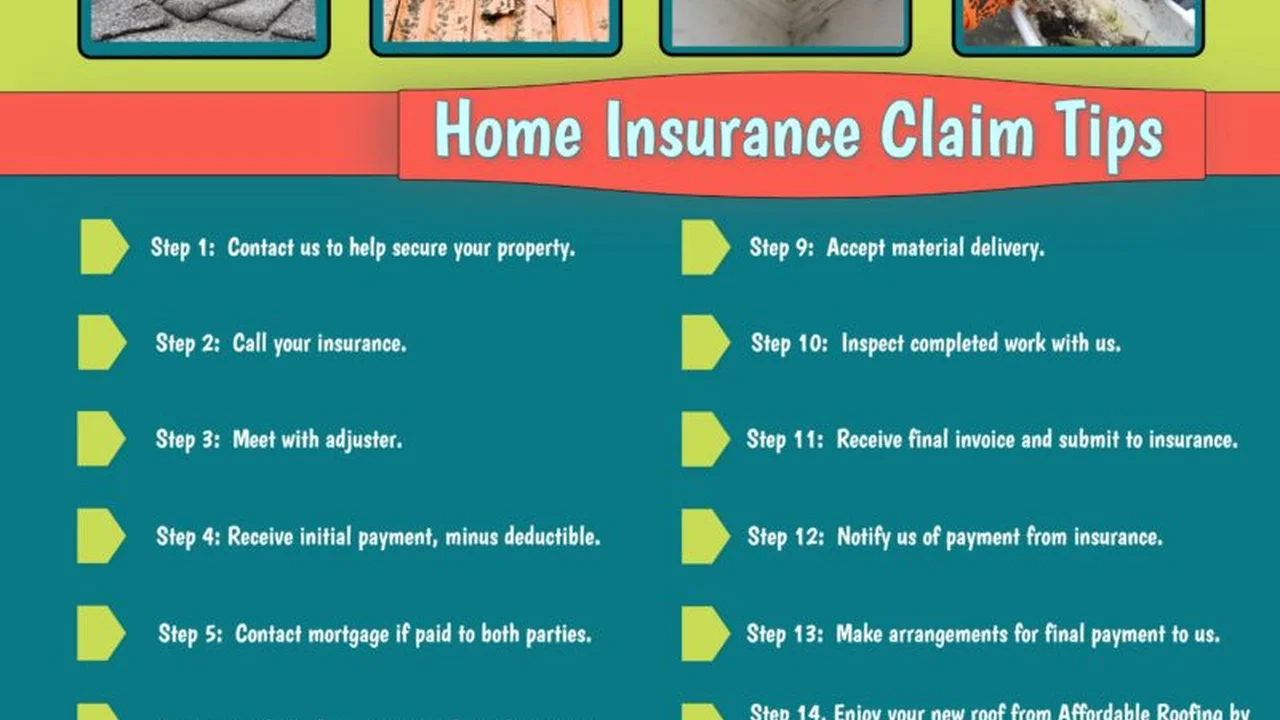
Step 2 Contacting Your Insurance Company and Filing the Claim
Once you've taken immediate steps to secure your property and document the damage, it's time to contact your insurance provider. Don't delay this step; most policies require you to report damage promptly. You can usually file a claim online, through a mobile app, or by calling their claims department directly. When you call, be prepared to provide your policy number, the date the damage occurred, and a brief description of the damage. Be honest and factual, sticking to what you know and have observed. Avoid speculating about the cause or extent of the damage. The insurance company will assign a claim number and a claims adjuster to your case. This adjuster will be your primary point of contact throughout the process. Ask for their contact information and the estimated timeline for their inspection. It's a good idea to keep a detailed log of all communications with your insurance company, including dates, times, names of people you spoke with, and a summary of the conversation. This documentation can be incredibly helpful if any disputes arise later. Remember, the insurance company's adjuster works for them, not for you. While they are professionals, their goal is to assess the damage and determine coverage based on your policy. Having your own documentation and a contractor's assessment can help ensure a fair evaluation.
Step 3 The Insurance Adjuster Inspection and Contractor Collaboration
After filing your claim, an insurance adjuster will be assigned to inspect your roof. This is a critical step in the process. It's highly recommended that you are present during this inspection. Even better, have your chosen roofing contractor present as well. Why? Because your contractor can point out damage that might not be immediately obvious to the adjuster, especially if they're not a roofing specialist. They can speak the same technical language and ensure that all damage, including less visible issues like granule loss or soft spots, is properly identified and documented. Before the adjuster arrives, make sure the area around your home is clear and safe for them to access the roof. Provide them with all the documentation you've gathered: photos, videos, and your detailed list of damages. Your contractor can also provide their own assessment and estimate at this stage. This collaboration between you, your contractor, and the adjuster can lead to a more thorough and accurate assessment of the damage and the scope of repairs needed. Don't be afraid to ask questions during the inspection. Understand what the adjuster is looking for and how they are assessing the damage. If there's a disagreement on the extent of the damage, your contractor's professional opinion can be invaluable in advocating for a comprehensive repair plan.
Step 4 Reviewing the Adjuster's Report and Understanding the Estimate
Once the adjuster has completed their inspection, they will typically generate a detailed report and an estimate for the repairs. This report will outline the damage they found, the cause of the damage (as determined by them), and the estimated cost to repair or replace your roof. It's crucial to review this report and estimate very carefully. Compare it against your own documentation and your contractor's assessment. Does it cover all the damage you observed? Are the material costs and labor rates fair and reflective of current market prices in your area? Pay close attention to line items and ensure nothing is missing. For example, does it include the cost of permits, dumpster rental, or any necessary upgrades to meet current building codes? If your policy is RCV, the initial payout might be the ACV, with the remaining depreciation released once the work is completed and proof of payment is submitted. Understand this two-payment system if it applies to your policy. If you find discrepancies or believe the estimate is too low, don't hesitate to discuss it with your adjuster. This is where your contractor's detailed estimate can be a powerful tool. They can help you understand any technical jargon in the adjuster's report and advocate for a more comprehensive scope of work. If you still can't reach an agreement, you might need to consider further steps, which we'll discuss shortly.
Step 5 Choosing a Roofing Contractor and Scheduling Repairs
With an approved claim and an understanding of your insurance payout, the next step is to choose a reputable roofing contractor and get the repairs underway. This is a critical decision, as the quality of the work will directly impact the longevity and performance of your new or repaired roof. Here are some tips for choosing the right contractor:
Key Considerations for Selecting a Roofing Contractor
- Local and Established: Prioritize contractors with a strong local presence and a proven track record. They're more likely to be familiar with local building codes and readily available for follow-up.
- Licensed and Insured: Always verify that the contractor is properly licensed and carries both liability insurance and workers' compensation. This protects you from potential financial responsibility if an accident occurs on your property.
- References and Reviews: Ask for references from previous clients and check online reviews on platforms like Google, Yelp, or the Better Business Bureau.
- Detailed Estimates: Ensure they provide a comprehensive, written estimate that clearly outlines the scope of work, materials to be used, timeline, and payment schedule. This estimate should ideally align with your insurance adjuster's report.
- Warranty Information: Inquire about both material warranties (from the manufacturer) and workmanship warranties (from the contractor). A strong warranty offers peace of mind.
- Experience with Insurance Claims: A contractor experienced in working with insurance claims can be a huge asset, helping you navigate paperwork and communicate effectively with your adjuster.
Recommended Roofing Contractors and Their Specialties
While I can't endorse specific companies without knowing your exact location, here are types of contractors and what to look for:
- Large Regional Roofing Companies: These often have extensive resources, multiple crews, and can handle large-scale projects efficiently. They typically have dedicated insurance claims departments. Examples might include 'ABC Roofing' or 'XYZ Exteriors' in major metropolitan areas. They often work with a wide range of materials like asphalt shingles, metal, and TPO.
- Local Family-Owned Businesses: These often provide a more personalized touch and can be very responsive. They might specialize in certain types of roofing common in your area, like tile or wood shakes. Look for companies with 20+ years of experience in your specific region.
- Specialty Roofers: If you have a unique roof (e.g., slate, copper, green roof), you might need a contractor who specializes in those materials. These contractors often have niche expertise and certifications.
Typical Pricing and Service Offerings
Pricing for roof repair or replacement varies wildly based on location, material, roof size, pitch, and complexity. A full asphalt shingle roof replacement in the US can range from $8,000 to $25,000+. Metal roofs are typically 2-3 times more expensive. In Southeast Asia, costs can be lower for labor but material costs might be similar or higher depending on import duties. Most reputable contractors will offer:
- Free roof inspections and damage assessments.
- Assistance with insurance claims documentation.
- Emergency tarping services.
- Full roof replacement or repair.
- Gutter and downspout installation/repair.
- Ventilation system upgrades.
Once you've selected a contractor, review their proposal carefully. Ensure it aligns with the insurance scope of work and your budget. Sign a detailed contract before any work begins, outlining all terms, conditions, and payment schedules. Your contractor will then schedule the work, obtain necessary permits, and begin the repair or replacement process. Stay in communication with them throughout the project to address any questions or concerns.
Step 6 Managing the Repair Process and Final Payment
With your contractor selected and the work scheduled, the repair process begins. It's a good idea to stay informed and engaged throughout this stage. Your contractor should keep you updated on progress, potential delays, and any unforeseen issues that arise. If your insurance policy is RCV, remember that the final depreciation holdback will only be released after the work is completed and you've submitted proof of payment to your insurance company. This means you'll likely receive an initial payment (ACV) to start the project, and the remaining funds will come after completion. Ensure your contractor understands this payment structure. Once the repairs are complete, conduct a thorough final inspection with your contractor. Walk around your home, check the roof from the ground (or from a safe vantage point), and look for any signs of incomplete work or issues. Don't hesitate to point out anything that doesn't look right. Once you're satisfied with the work, your contractor will typically provide you with a certificate of completion and a final invoice. Submit this invoice and any other required documentation to your insurance company to receive the final payment. Make sure all lien waivers are signed by the contractor and any subcontractors to protect yourself from future claims. Finally, remember to keep all documentation related to your roof repair or replacement, including warranties, for future reference.
Step 7 What to Do If Your Claim is Denied or Underpaid
Sometimes, despite your best efforts, an insurance claim might be denied or the payout might be significantly less than what's needed for repairs. Don't panic, and don't give up! You have options. The first step is to understand *why* the claim was denied or underpaid. Request a detailed explanation in writing from your insurance company. Common reasons include damage being attributed to wear and tear, pre-existing conditions, or not meeting the deductible. Once you understand the reason, you can begin to build your case for an appeal.
Strategies for Appealing a Denied or Underpaid Claim
- Gather More Evidence: If the denial was due to insufficient evidence, gather more photos, videos, and a more detailed report from your roofing contractor. A contractor's professional assessment can often carry more weight.
- Get a Second Opinion: Consider getting an independent roof inspection from a different, highly reputable contractor. Their report might contradict the adjuster's findings.
- Review Your Policy Again: Double-check your policy language to ensure the insurance company's interpretation aligns with the terms. Sometimes, a specific clause might be overlooked.
- Write a Formal Appeal Letter: Clearly state why you believe the decision is incorrect, referencing specific policy language and providing all your supporting documentation. Be polite but firm.
- Request a Re-inspection: Ask for a different adjuster to conduct a re-inspection of your roof. A fresh pair of eyes might see things differently.
- Consider a Public Adjuster: A public adjuster is an independent claims adjuster who works exclusively for you, the policyholder, not the insurance company. They are experts in insurance policies and can negotiate on your behalf. They typically charge a percentage of the settlement, but they can often secure a much higher payout. This is a good option if the claim is substantial and you're facing significant resistance.
- Legal Counsel: As a last resort, if all other avenues fail, you might consider consulting with an attorney specializing in insurance claims. They can advise you on your legal options.
Remember, the goal is to present a clear, well-documented case that demonstrates your roof damage should be covered under your policy. Persistence and thorough documentation are your best allies in this process.
Preventative Maintenance to Avoid Future Claims
While you can't prevent every type of roof damage, proactive maintenance can significantly reduce the likelihood of future claims and extend the life of your roof. Think of it as an investment in your home's long-term health. Regular inspections and timely repairs can catch small issues before they escalate into major, costly problems.
Essential Roof Maintenance Tips
- Annual Roof Inspections: Have your roof professionally inspected at least once a year, ideally in the spring or fall. A professional can spot subtle signs of wear, loose shingles, or potential leak points that you might miss.
- Gutter Cleaning: Keep your gutters and downspouts clear of leaves, debris, and shingle granules. Clogged gutters can lead to water backing up under your shingles, fascia damage, and even foundation issues.
- Trim Overhanging Branches: Trees with branches directly over your roof pose a risk. Strong winds can cause branches to scrape against shingles, leading to damage, or even fall onto your roof during a storm. Trim them back regularly.
- Check for Missing or Damaged Shingles: After strong winds or storms, visually inspect your roof for any missing, cracked, or curled shingles. Repairing these promptly can prevent water intrusion.
- Inspect Flashing: Flashing around chimneys, skylights, and vents is crucial for preventing leaks. Ensure it's intact and properly sealed.
- Look for Moss and Algae: Moss and algae can trap moisture and degrade roofing materials. Address these growths with appropriate cleaning solutions or by installing zinc or copper strips.
- Ensure Proper Ventilation: Good attic ventilation is vital for regulating temperature and moisture, which helps prevent premature aging of your roof and reduces the risk of ice dams in colder climates.
- Address Minor Repairs Promptly: Don't put off small repairs. A minor leak can quickly become a major problem if left unaddressed.
By following these preventative maintenance tips, you're not only protecting your investment but also potentially saving yourself the hassle and stress of future insurance claims. A well-maintained roof is a happy roof, and a happy roof means a happy homeowner!
Navigating the Claims Process with Confidence
Dealing with roof damage and the subsequent insurance claim can feel overwhelming, but by breaking it down into manageable steps, you can navigate the process with confidence. Remember, preparation and documentation are your best friends. From understanding your policy and taking immediate action to choosing the right contractor and advocating for a fair settlement, each step plays a crucial role in ensuring a successful outcome. Don't be afraid to ask questions, seek professional advice, and stand up for your rights as a policyholder. Your home is one of your biggest investments, and protecting it means ensuring your roof is in top condition. By following this guide, you're well on your way to getting your roof repaired or replaced efficiently and effectively, allowing you to get back to enjoying your home without the worry of a damaged roof overhead.
:max_bytes(150000):strip_icc()/277019-baked-pork-chops-with-cream-of-mushroom-soup-DDMFS-beauty-4x3-BG-7505-5762b731cf30447d9cbbbbbf387beafa.jpg)